Microscopy skills at Higher Level: The same skills as SL, set in Paper 1B on both levels. HL papers have asked for magnifications of electron micrographs, why root tips are stained, and how to make and view a mount with reasons.
Practise this as you read
- Calculate a magnification from a scale bar.
- Explain each step of making and viewing a mount.
Free preview
This is the free notes preview
You're reading the free notes. Aimnova Pro unlocks the full study experience — and you can try it with your first topic free to keep:
- FlashcardsLock in vocabulary and key terms with spaced repetition.
- Practice questionsAnswer exam-style questions and get instant AI marking.
- Mock exams & past-paper vaultSit full mocks and see exactly how examiners award marks.
- Personalised study planA daily plan built around your exam date and weak areas.
The big idea: Most cells are far too small to see with the naked eye. To study them we use a microscope — a tool that makes small objects look much bigger.
Two things matter when choosing a microscope
- How much it magnifies (makes things look bigger).
- Its resolution (how much fine detail it can show).
- Microscope
- A tool that produces an enlarged image of a small object so we can study it.
- Magnification
- How many times bigger the image looks than the real object.
- Resolution
- The ability to show two close points as separate, rather than as one blur — in short, how much fine detail can be seen.
Magnification is not the same as resolution: You can magnify a blurry image as much as you like — it just gets bigger and blurrier.
Resolution is what actually lets you make out new detail. A good microscope needs both.
Study smarter, not longer
Most students waste 40% of study time on topics they already know. Our AI tracks your progress and optimizes every minute.
The big idea: To see cells with a light microscope, the specimen must be thin, flat and wet, and often stained.
The points to remember
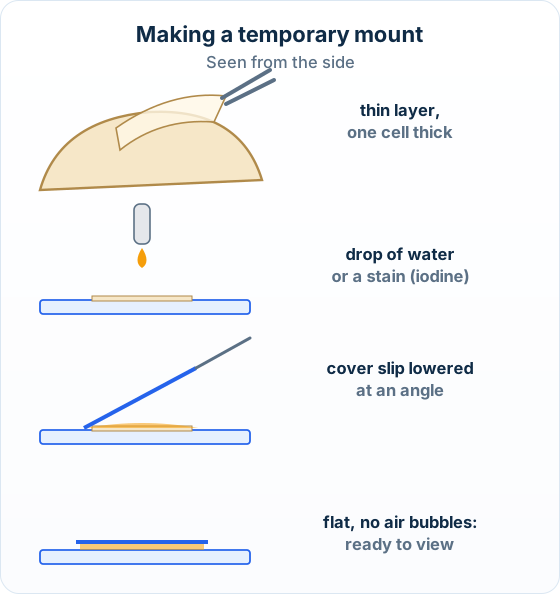
- Use a thin layer of tissue, one cell thick, so light can pass through it.
- Lay it flat on a glass slide and add a drop of water or a stain.
- Lower a cover slip at an angle, from one edge, so no air bubbles are trapped.
- A stain colours some structures more than others, so they can be seen (iodine stains starch and nuclei).
Remember it as: Thin, wet, covered: no bubbles.
Real example: an onion root tip: To see cells dividing, the tip of an onion root is squashed on a slide and stained. The stain makes the chromosomes visible, so each stage of division can be picked out.
When asked why a stain is used, name what it lets you see: for a root tip, the chromosomes, not just 'the cells'.
Making the mount is not viewing it: When asked how to prepare a mount, give the making steps only; putting it on the stage and focusing are not part of the preparation.
The cover slip is a thin piece of glass, not a second slide.
The big idea: Find the specimen at low power, then focus in two steps: coarse first, fine second.
The points to remember
- Start with the low-power objective lens: the field of view is larger, so the specimen is easier to find.
- Focus with the coarse adjustment knob first, then sharpen with the fine adjustment knob.
- Move to a higher power only once the part you want is in the centre of the view; refocus with the fine knob.
- Total magnification = eyepiece magnification × objective magnification (×10 eyepiece × ×40 objective = ×400).
Remember it as: Low power to find it, fine knob to sharpen it.
Low power
Large field of view: the specimen is easy to find.
Coarse focus
Big movements bring the image roughly into focus.
Fine focus
Small movements make the detail sharp.
Higher power
Centre the part first, then refocus with the fine knob.
Real example: a school microscope: A typical school microscope has a ×10 eyepiece and objectives of ×4, ×10 and ×40, so its total magnifications are ×40, ×100 and ×400.
Practice with exam-style questions
Answer exam-style questions and get AI feedback that shows you exactly what examiners want to see in a full-marks response.
The big idea: A graticule turns 'it looks small' into a number: measuring with an instrument is a quantitative observation.
The points to remember
- An eyepiece graticule is a small scale inside the eyepiece, used to measure cells.
- Its divisions have no unit until it is calibrated with a stage micrometer, a slide with a scale of known length.
- One graticule division = length on the stage micrometer ÷ number of graticule divisions it covers.
- Actual size = number of divisions × the length of one division. Calibrate again at each objective lens.
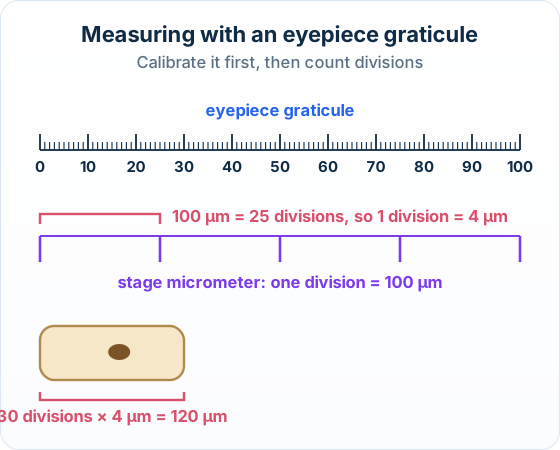
The two lines of working: One division = 100 µm ÷ 25 = 4 µm.
Actual length = 30 × 4 µm = 120 µm.
A number can be compared, averaged and checked by someone else, which a description such as 'small' cannot. That is why measurements make observations more objective.
The big idea: Magnification links three things: image size, actual size and magnification. Know two, find the third.
The points to remember
- Magnification = image size ÷ actual size. Rearranged: actual size = image size ÷ magnification.
- Put both lengths in the same unit first: 1 mm = 1000 µm.
- A scale bar shows how long a length on the image is in real life. Magnification = scale bar's printed length ÷ the length written on it.
- To draw a scale bar: printed length = actual length × magnification (10 µm at ×1000 = 10 mm).
- Give the answer with a unit (µm) or a × sign. A photo through the eyepiece can be measured the same way.
Remember it as: I AM: Image = Actual × Magnification.
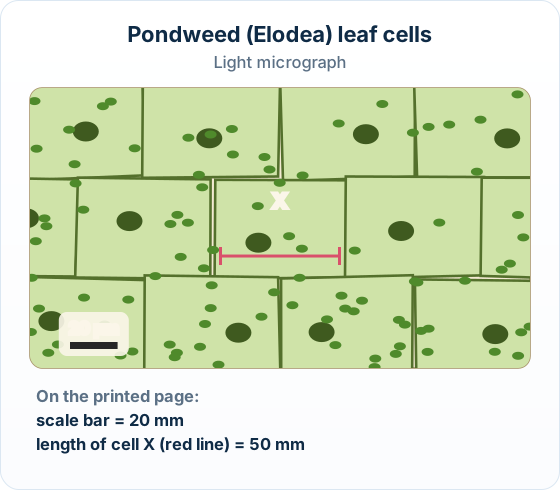
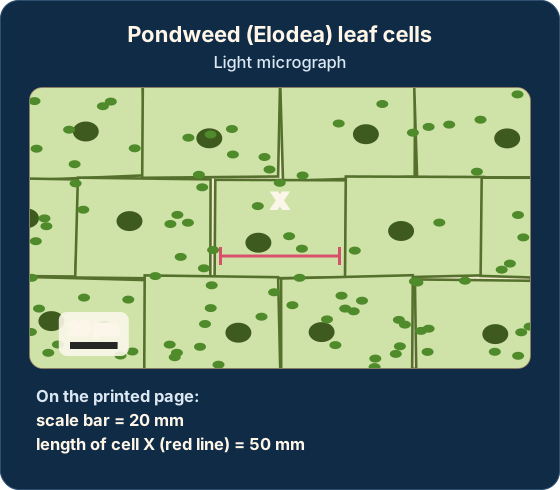
Change to the same unit
Scale bar 20 mm = 20 000 µm.
Magnification
20 000 µm ÷ 20 µm = ×1000.
Actual size of cell X
50 mm = 50 000 µm; 50 000 ÷ 1000 = 50 µm.
Units and the × sign: Change millimetres to micrometres before dividing. An actual size needs its unit (µm); a magnification needs a × and no unit.
Feeling unprepared for exams?
Get a clear study plan, practice with real questions, and know exactly where you stand before exam day. No more guessing.
How it is tested: Paper 1B opens with a micrograph: calculate a magnification, an actual size or a scale bar [1] each, name the eyepiece graticule, or describe how to make a temporary mount [3].
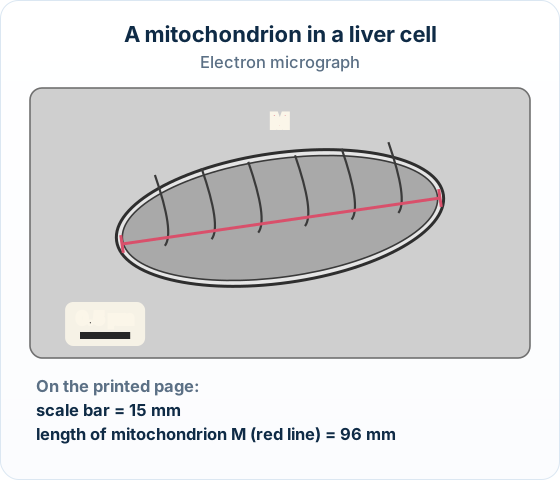
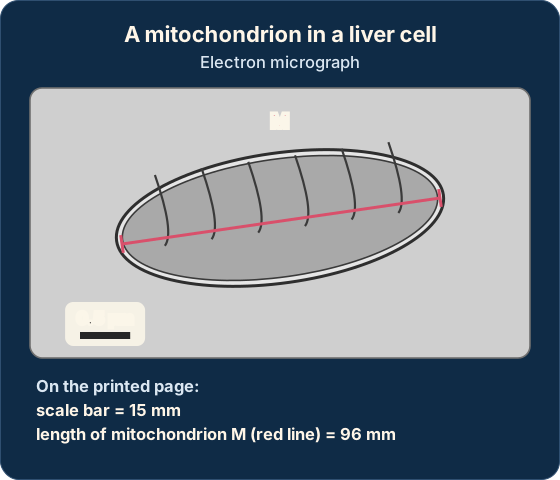
The electron micrograph shows a mitochondrion in a liver cell. On the printed page the scale bar is 15 mm long and the red line along mitochondrion M is 96 mm long.
(a) Calculate the magnification of the image.
(b) Calculate the actual length of mitochondrion M, giving the unit.
Model answer plan
See the answer broken into clear points, with guidance on how each point earns marks.
For a temporary mount [3]: Three making steps, one per line: thin layer on a slide; a drop of water or stain; a cover slip lowered at an angle to avoid air bubbles.